Create Store Products
Once you setup some Store Categories, you’ll be able to then create individual Store products with additional details.
1. Click the Green plus icon to add a new Store Product

Then fill in the following fields:
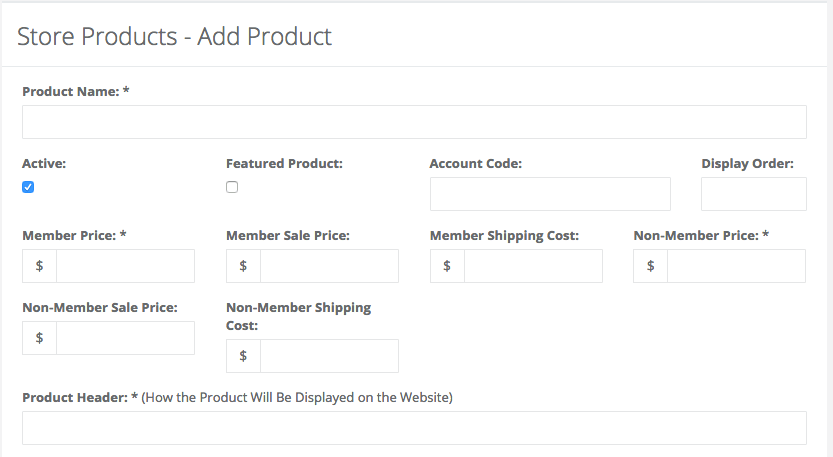
Product Name: for internal use only
Product Member Price: This price will be displayed for members in good-standing who are logged into their accounts.
Product Member Sale Price: This field is optional; only fill this out if you want to sell the product at a discount.
Product Nonmember Price: This does not have to be different from the Product Member Price.
Product Nonmember Sale Price:This field is optional; only fill this out if you want to sell the product at a discount.
Product Member Shipping Cost / Product Nonmember Shipping Cost: These are per item shipping costs. Click here if you would like to instructions on how to implement flat rate shipping for your store.
Display Order: By default, products are displayed in alphabetical order. Enter a number here if you would like to change that order.
Active: If this box is checked, the product will appear on the website as soon as the product is saved.
Featured Product: Checking this box will cause the product to appear in a featured product inset at the top of the rest of the product listings.
Product Header: This is the name of the product as displayed on your website.
Product Description
Categories: All available categories are listed in the left column. Move any categories you would like applied to the product using the right-pointing arrows. The single arrow will move the category selected, and the double arrow will move all categories. You can remove categories from the product by selecting them in the right column and clicking the left-pointing arrow buttons.

Click Continue to save the product.
At this point you have the option to add product images. You can select any files you wish to upload to the product by clicking the Add Files button. This adds them to the upload queue. Click Upload to add the images to the product.
Once the images have been uploaded, they will appear in the table. The first image listed will be the featured product image, and any additional images will appear as thumbnails that can be viewed in a slideshow. You can reorder the images by changing the number in the Sequence column assigned to each and hitting the refresh button. You can also edit the name of the image and the description.

Be sure to click Update Store Product after you make any changes or they will be lost.